Images and Your Site
 Let me begin by saying I am NOT an image expert by any means, but I have learned a LOT about images and how they can help with your site and how they can cause issues with your site. They can bring traffic via social media and Pinterest, but they can also drop your ranking on Google if you don't follow best practices.
Let me start with the things to avoid. First, watch your file size. Images can really slow down your site, and load time does make a difference when it comes to Google ranking. Saving your images as JPEGs versus PNG helps a lot, and if you have a post with a lot of images, using Tiny PNG can compress the image size without the images getting blurry. Load time is especially important on mobile devices where the majority of readers view your content.
Another important tip with images is to make sure that you add information in the properties of your image. You can find the properties simply by clicking the image once it's loaded. Open the properties and write a sentence or two in the title and alt text lines. These sentences become the text in your pin if someone pins it.
Finally, images should be left as much as possilbe in their original size. If your site must shrink or enlarge an image, the load time increases. Think extra work or an extra step.
Image Creation
To make images for my blog posts, I use a combination of Powerpoint and Picmonkey to enhance my images. With Powerpoint, you have two options. You can use the design tab and make your photo the "background" if your slide size is a similar shape to your photo, or you can insert the photo as an overlay and just layer text boxes over the top. With the image above, I made the photo my background under the "design" tab, but I had to format the background offset so the image wasn't distorted. Once you're happy with your slide, you "save as" a jpeg or png file and upload it into your post. Many beginners insert their photos "centered". Do not feel nervous about moving them to the right or left of text. All you do is click and drag it where you want. If Blogger doesn't cooperate, then you can always delete and retry with your cursor in a different location. With my images, I use a variety of sizes...portrait, landscape, and square for all my social media sites.
I mentioned Picmonkey earlier. Sometimes, I use Picmonkey to edit a photo, to create custom sized graphics, or for the collage option. You can easily add frames, edit the photo, add overlays such as ribbons, labels, or partially transparent shapes. Picmonkey also allows you to use your own fonts with their program, and I love that I can grab the resize buttons of text boxes and stretch the text to the exact spacing I want. For details on how to use Picmonkey's features, check out this video (and search for others on Youtube). Picmonkey is such a great FREE site, but if you see "royal" features you like, I personally feel it's worth the $4.99 a month price.
Image Editing Features in Blogger
Once you've prepared your image, the important work begins. Remember, your images are pinned, so think from the pinner's point of view. A year from now, what will the pinner need to know? They will need to know where the photo came from, so be sure to watermark EVERY image in your post. Adding your logo is very important now that Pinterest locates similar images. Shoppers who love something of yours can look for your logo to see what else you've made or have available.In addition to your logo, be sure to use large lettering to make it clear what the images is linked to. I've tried to add my blog post title to all images, and I pin them all no matter the size because the more images out there, the more likely someone will come to visit.
When editing your images do remember a polished look matters. Add frames, accent clip art, and titles to make your image stand out.
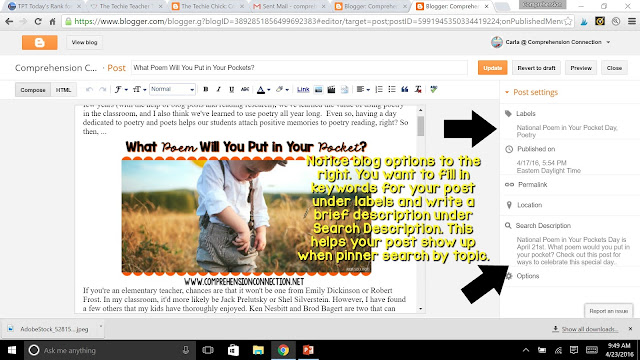
After you insert the image, you will need to take care of a few more steps. So that I don't forget, I always take care of labels and my search description first. You see these post settings on the right side of blogger. If the Search Description is missing, you need to check your blogger settings (Search Preferences) and turn on the Meta Tag.
 Next, work on the settings for your image. Set the image size (Large or XL for images that you really want to feature or Small/Medium for products or less important images). Then, you will click on the properties tab. This step is very important. Once you click that, you will see two lines, title text and alt text. Put what you'd want pinned in the alt text line as well as the title text line. Now, this works IF you use the Pinterest pin it button. If you have a cute pin it button installed, what will show up with the pin is the blog post title only.
[THIS POST] on CHALK AND APPLES will walk you through how to fix the pin it button on your blog. Again, remember the goal is to make your content work for the reader, and the description helps those who pin from your blog as well as pinners who happen to see the pin on Pinterest later.
When you add your description to the alt text, try to be consistent with using the same phrases in your title, search description, and alt text. When pinners search by topic, these phrases will help your pin show up in the search results. Notice in the image to the right. I wanted National Poem in Your Pocket Day to be in my alt text, search description, and title since that's likely a search phrase.
Image Size for Social Media
 Sharing your post to social media is the final (and probably the most important) step, but there are important considerations for this too. [THIS POST] includes all of the dimensions you need to know for social media. I recommend you create a file in Powerpoint with the slide dimensions preset for each social media site you plan to use. Of course, Instagram is easy. Any square image will do. You'd likely want to share to Facebook too, so make sure you have a landscape image (or create one) that you will use there. It does not have to be part of your blog post. For this post, I made this image for Facebook, but again, I don't always include that image in my post, but rather just get the post URL, write up a post description, and insert the image I've made.
Stock Photos
Another important point with images is with what's okay and not okay to use on your site. Make sure that all images are cleared for commercial use. If you use a photo that you took, you are good to go. Sometimes, though, we want to emphasize a key point and that's when stock photos come in handy. Pixabay is free for commercial use, and I highly recommend you stop there first before purchasing a stock photo.Find it on Youtube
My final tip for beginners is to use what's available on Youtube to help you. I am a visual learner, and if I am ever unsure how to do something with technology, I search Youtube first. There are so many great tutorials out there that you can almost always find what you need by Googling or Youtube. As you begin your blogging adventure, remember it's a journey. You won't know it all with the first post and you learn best by just digging in and trying. Blogging, for personal or professional goals, is a great way to share information. For teachers, it provides us with a great way to reflect on our practice. No matter your reason for blogging, I hope you find it a great experience.Have a great week!


